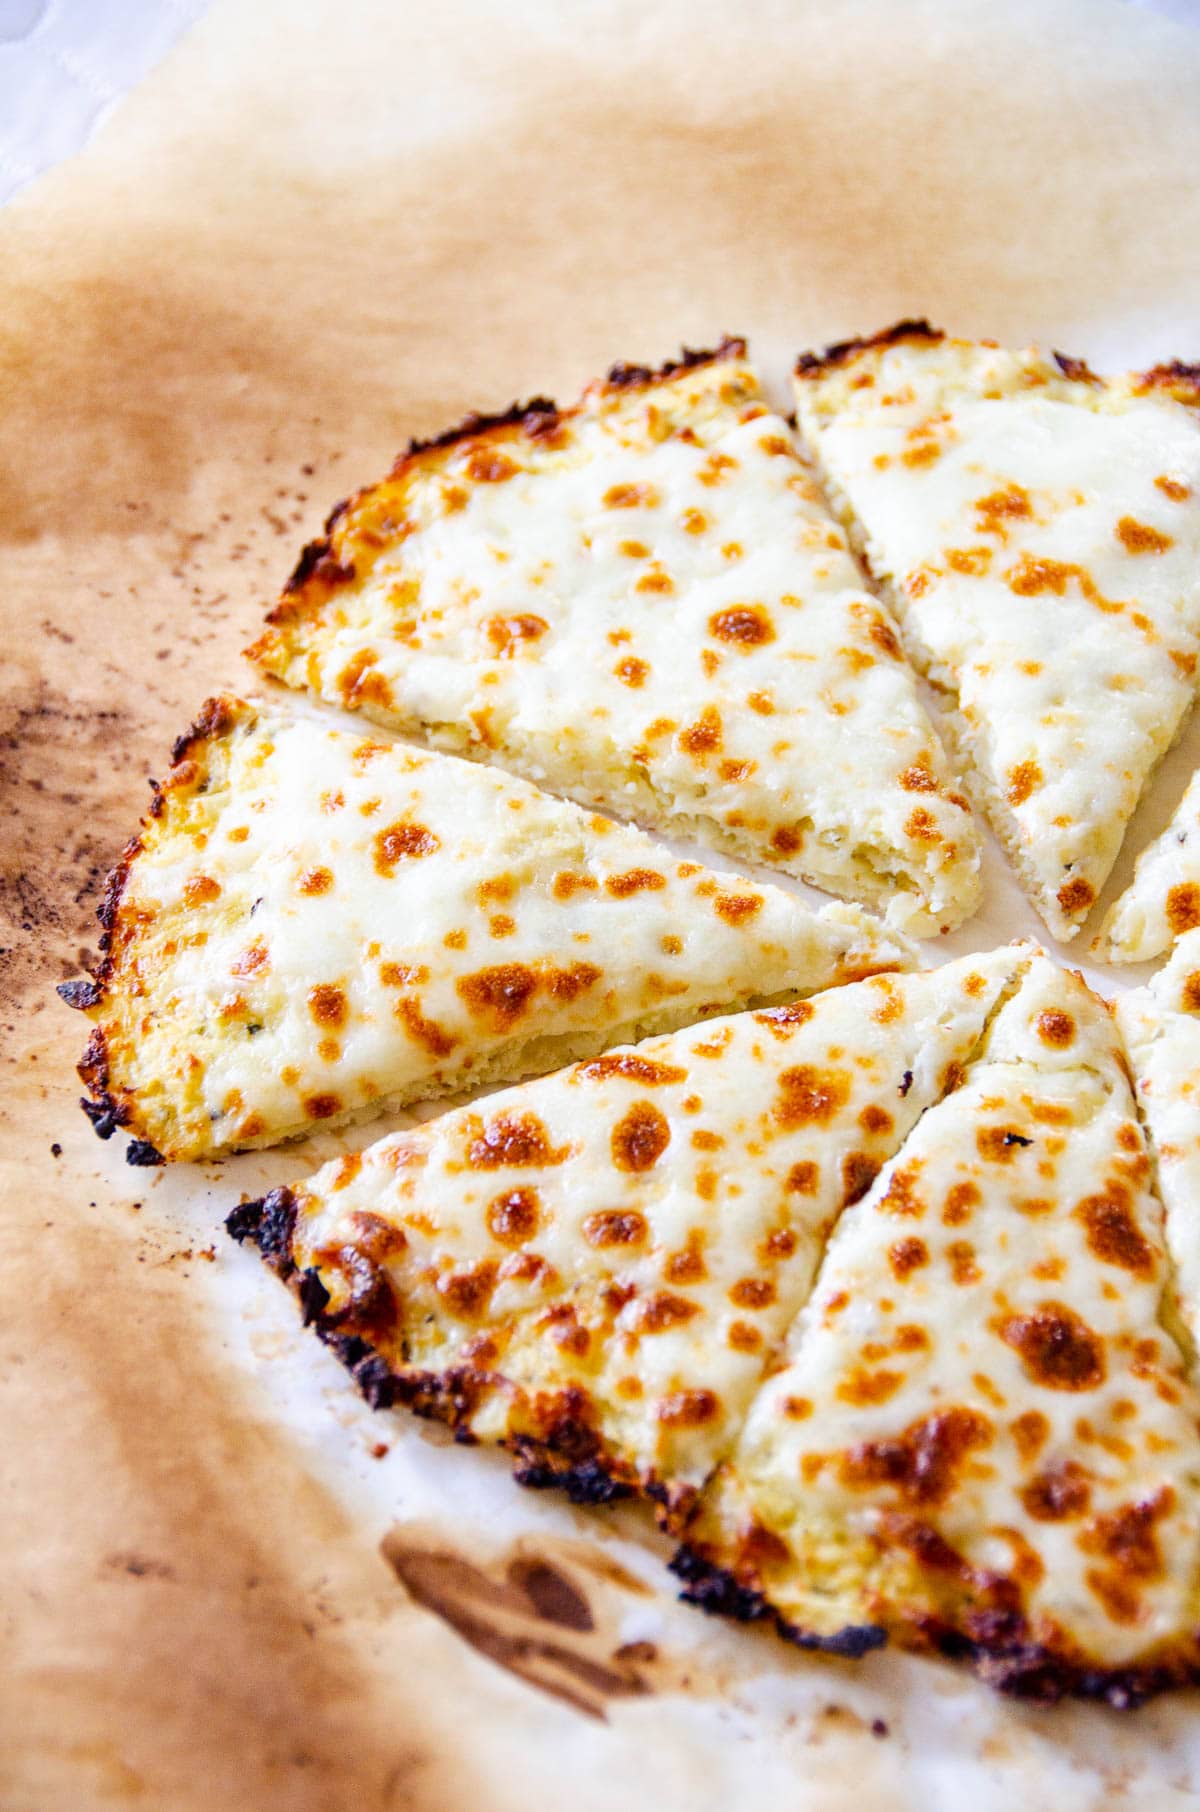
Cauliflower Pizza Crust recipe that comes out crispy, you can hold the slice and use fresh or frozen cauliflower, or cauliflower rice to make it. Tasty, low carb, naturally gluten-free pizza crust with over 500 reviews!
Why You’ll Love This Recipe

- Foolproof recipe: Well-tested cauliflower pizza crust recipe with detailed video instructions and over 550 five star reviews!
- The best recipe on the web: I have been making this cauliflower pizza crust since 2014! It’s not soggy, has crispy edges and you can really hold the slice!
- Low carb: One slice of cauliflower pizza contains 4 grams of carbs.
- Tasty: I will not lie, this low carb crust doesn’t taste like traditional pizza crust and has a bit of cauliflower flavor. But it is still very tasty and cheesy!
- Versatile: You can make it with fresh or frozen cauliflower, or cauliflower rice.
Reader’s Review
This was sooooo good and I’m very impressed with how well it holds together. It can be picked up and eaten like flour crust. I will definitely make this over and over! Thank you!
Roberta
Ingredients for Cauliflower Pizza Crust
To make this cauliflower pizza crust recipe, you will need just 7 simple ingredients, including salt and pepper.
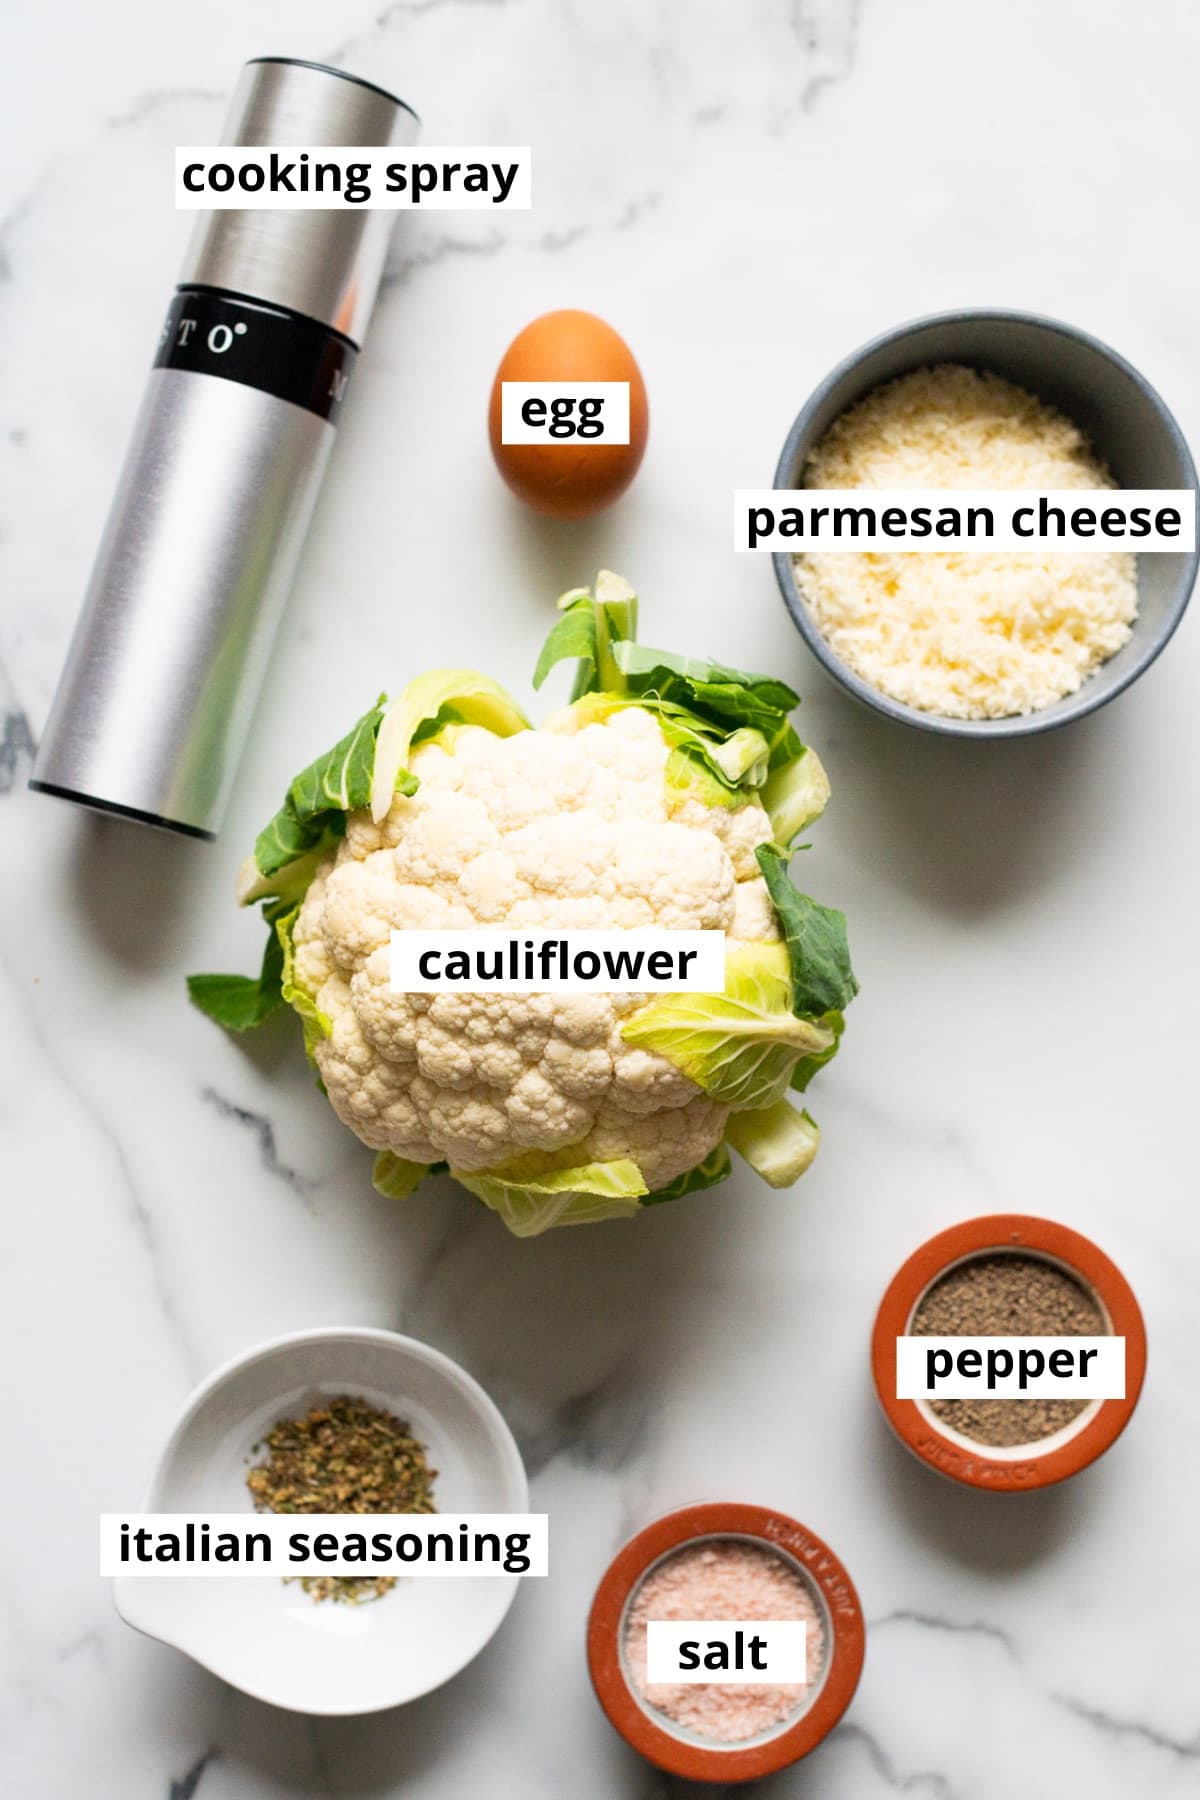
- Cauliflower: You will need a large head of cauliflower, 6″ – 7″ in diameter, about 2 – 2.5 pounds. Or you can use two 12-16 oz packages of store bought fresh or frozen cauliflower rice.
- Egg: Egg is part of “the glue” that holds cauliflower pizza dough together.
- Parmesan cheese: As cheese melts during baking, it helps to bind small pieces of cauliflower into a crust. Cheese is crucial, so is the egg. If you need to avoid both, try vegan cauliflower pizza crust.
- Spices: Simple dried herbs like oregano, basil or Italian seasoning plus salt and pepper add flavor to the crust. Also you can add garlic powder. Otherwise, cauliflower by itself is pretty bland vegetable.
Double the Recipe
But I won’t lie, making cauliflower crust is time consuming and labor intensive, so I highly recommend to make 2 crusts. You can freeze one for later too!
What Is the Best Cauliflower to Use?
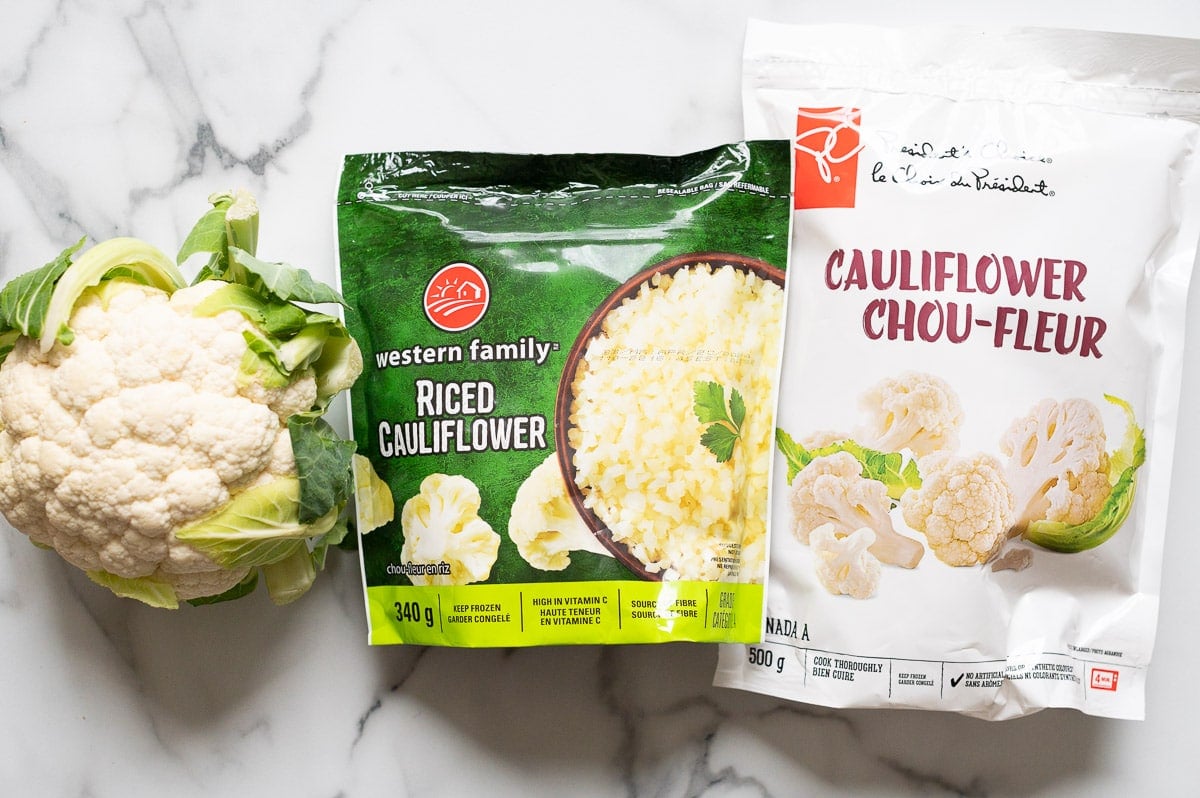
- Fresh head of cauliflower
- Cauliflower rice (fresh or frozen)
- Frozen cauliflower florets
I have tested all options and it truly doesn’t matter which cauliflower you use for this recipe. It comes down to your budget and your grocery store’s stock. You will save time by using cauliflower rice and frozen florets, and you will save money (in most cases) if you use a head of cauliflower.
If you are wondering, I used fresh cauliflower this time.
How to Cook Each Type of Cauliflower
Here is a quick breakdown how to cook each type of cauliflower for the cauliflower pizza crust.
Fresh Cauliflower
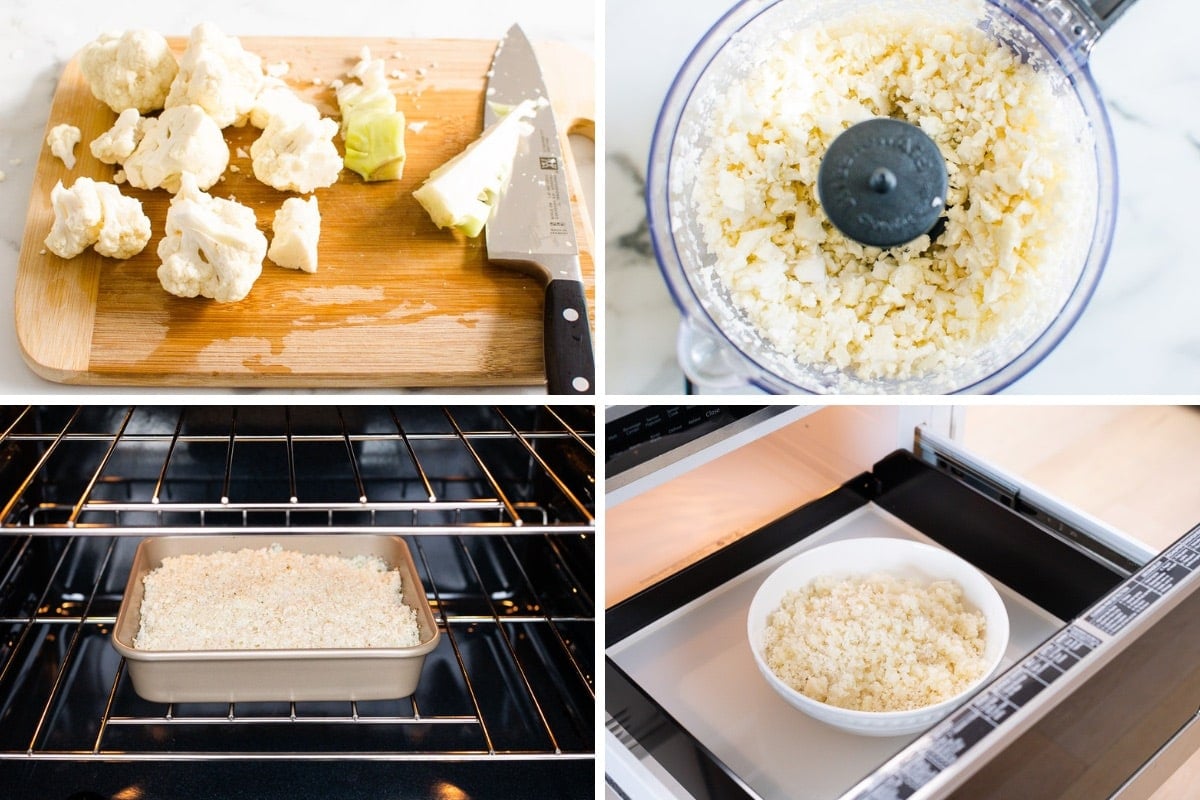
- Separate cauliflower: Using a paring knife, remove the outer leaves, rinse it and separate florets one by one. Here is easy tutorial on how to cut cauliflower. Core is used too, so do not discard.
- Rice it: Place cauliflower florets in a food processor and process until “rice” texture, some coarse chunks are fine. Here is detailed tutorial how to make cauliflower rice.
- Cook it: There are 2 options. You can either spread “the rice” in even layer on same large baking sheet you will be baking crust on, or pile in a baking dish and bake at 375 F for 15 minutes. Or cook it in a microwave-safe bowl for 8 minutes.
Cauliflower Rice
To cook pre-made cauliflower rice, all you have to do is microwave it in a large bowl for 8 minutes or bake in the oven at 375 F for 15 minutes. Same process as with homemade cauli rice above.
No need to defrost first!
Frozen Cauliflower Florets
Thaw cauliflower in the fridge overnight and then process in your food processor. Cook it as with other types of cauliflower.
How to Make Cauliflower Pizza Crust
Now that you have your cauliflower ready, here is step-by-step process how to make cauliflower pizza crust with it. There is also a full recipe card and video below.
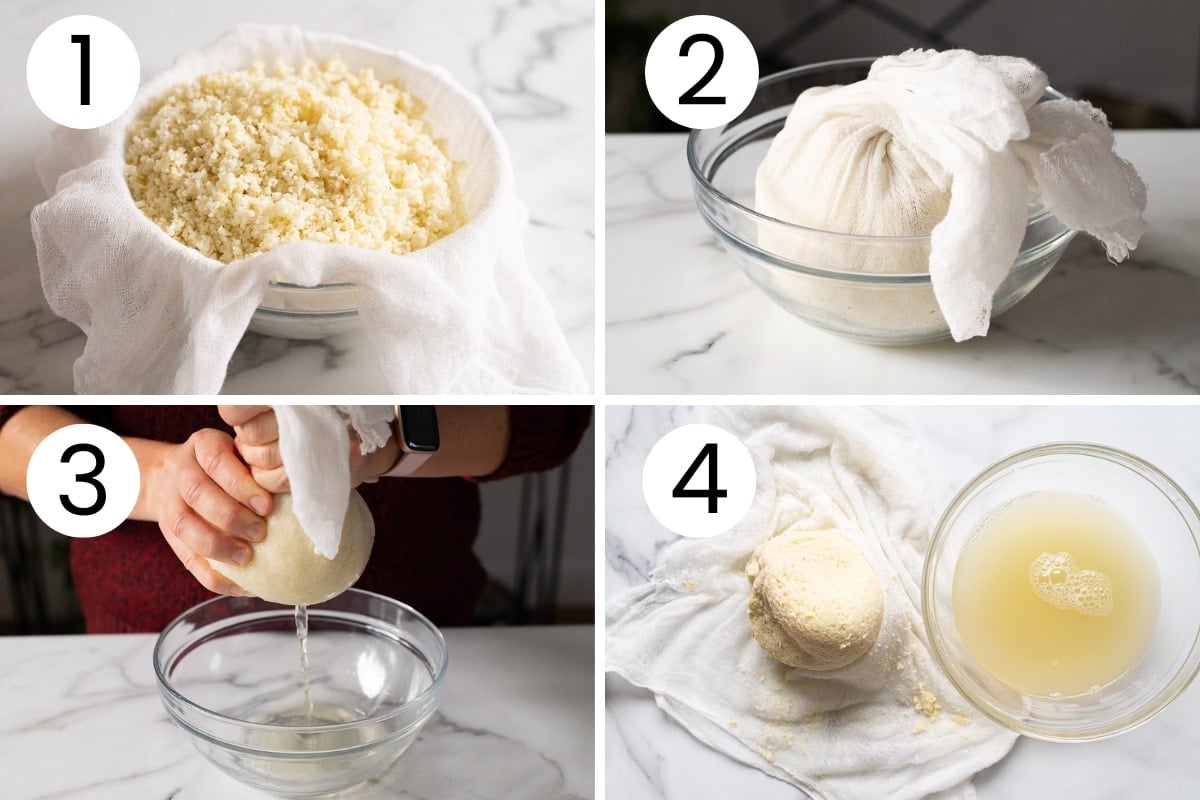
- Cool cooked cauliflower: If you cooked the cauliflower, you will have to let it cool first because we will be touching the ball with hands to squeeze. Line large bowl with cheesecloth or linen/cotton dish towel, transfer cauliflower to it and let cool until safe to the touch.
- Squeeze the water out: Holding by the four corners of a cheesecloth with one hand, squeeze out as much liquid and moisture as you can with another hand. I squeezed and then moved the cauliflower around a bit, and squeezed more. You should be left with a cauliflower mash that is very-very dry and about 1 1/2 cups of liquid.
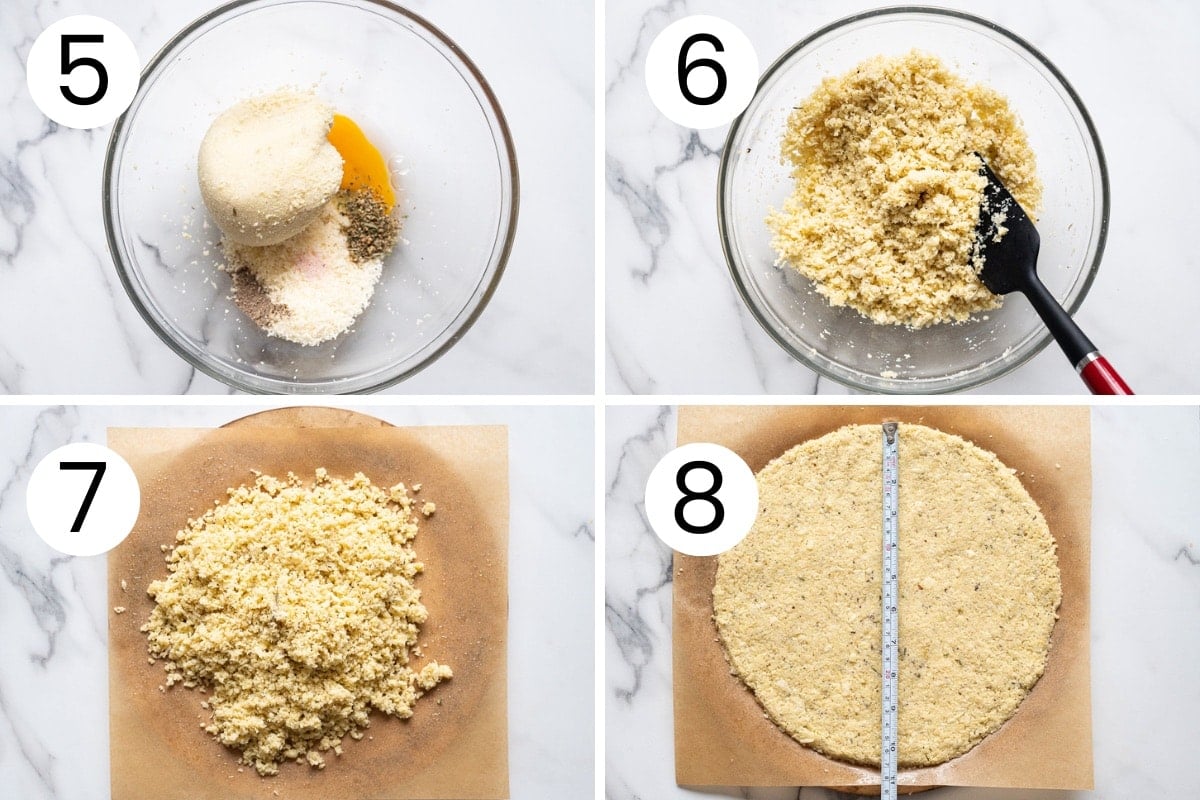
- Make pizza crust dough: Transfer squeezed cauliflower to a large bowl. Add egg, Italian seasoning, cheese, salt, pepper, and mix well.
- Shape the crust: Line rectangle or round sheet pan, or pizza stone with parchment paper and spray with cooking spray well. Transfer cauliflower mixture onto it and using your hands, flatten the dough into about 11 inches wide crust. Make edges same thickness too.
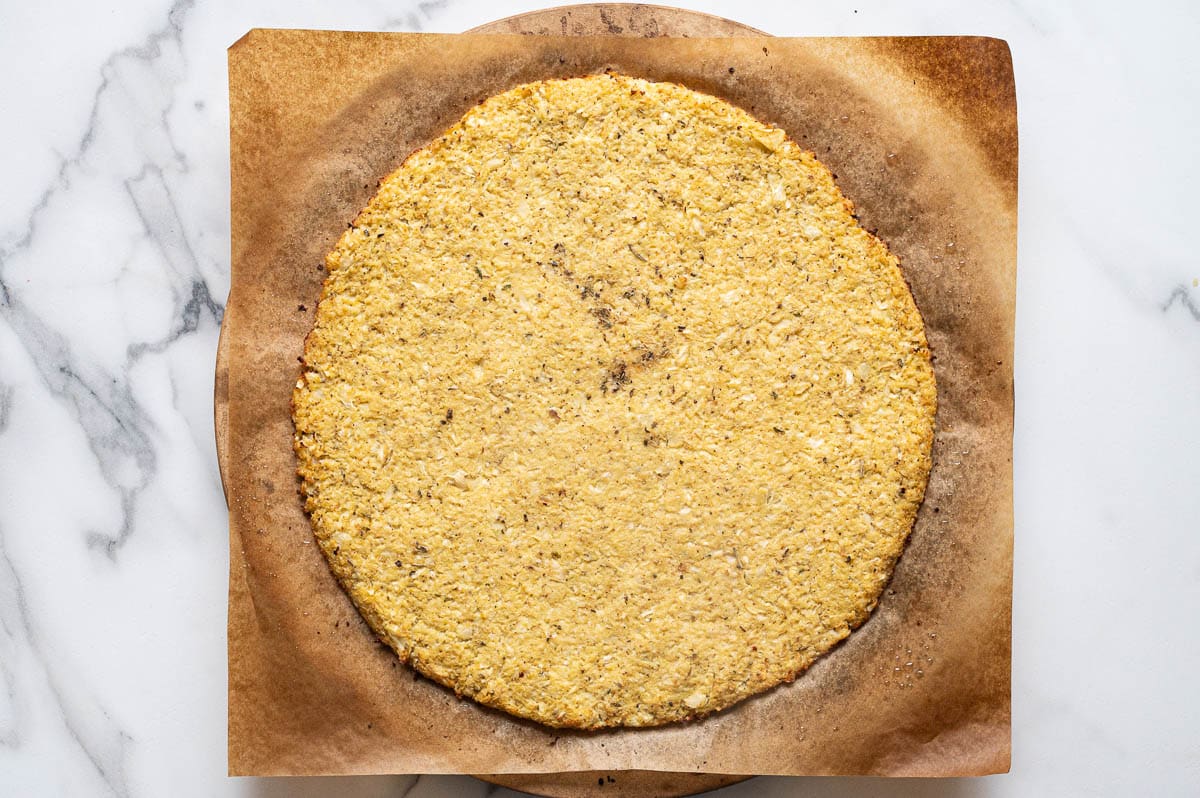
- Bake it: Bake cauliflower crust at 450 degrees F for 20 minutes or until golden brown and crispy edges. For more crispy crust, flip and bake for a few more minutes.
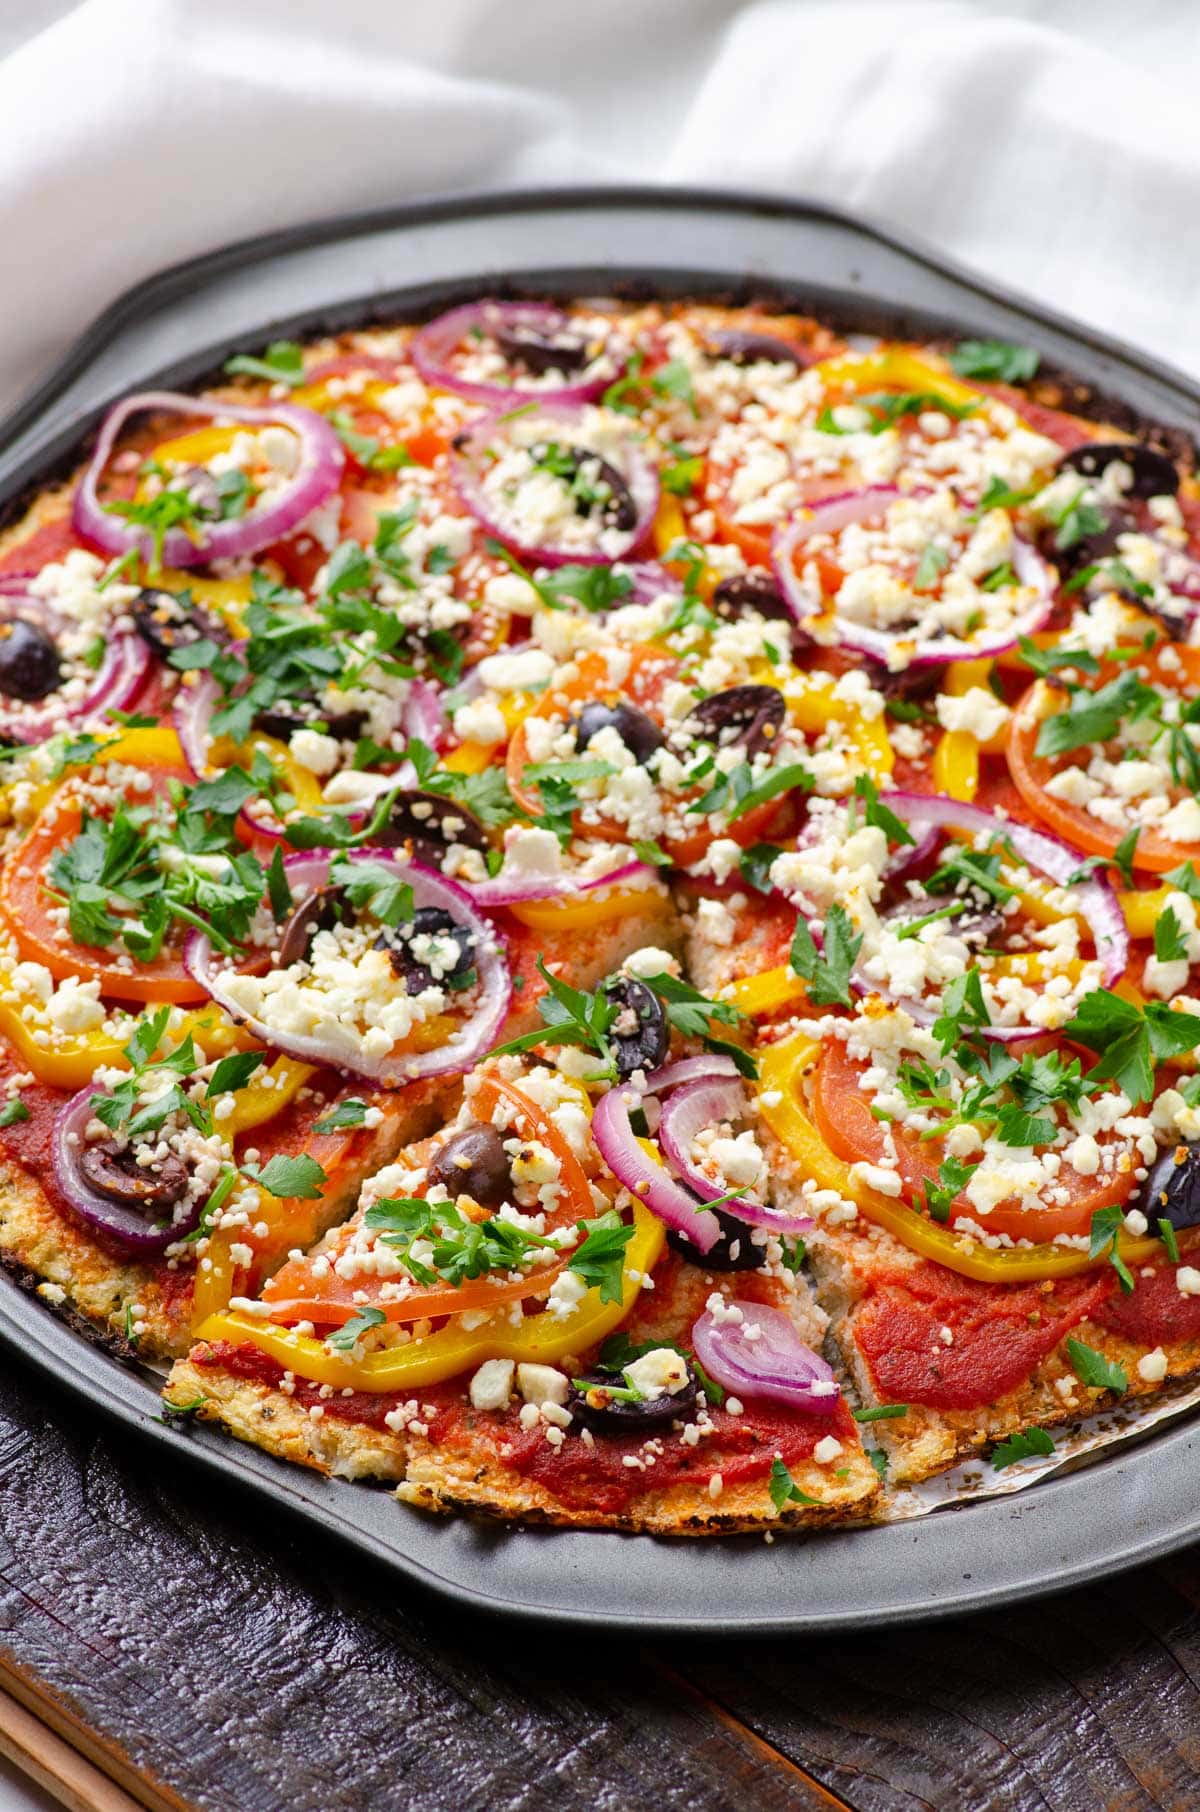
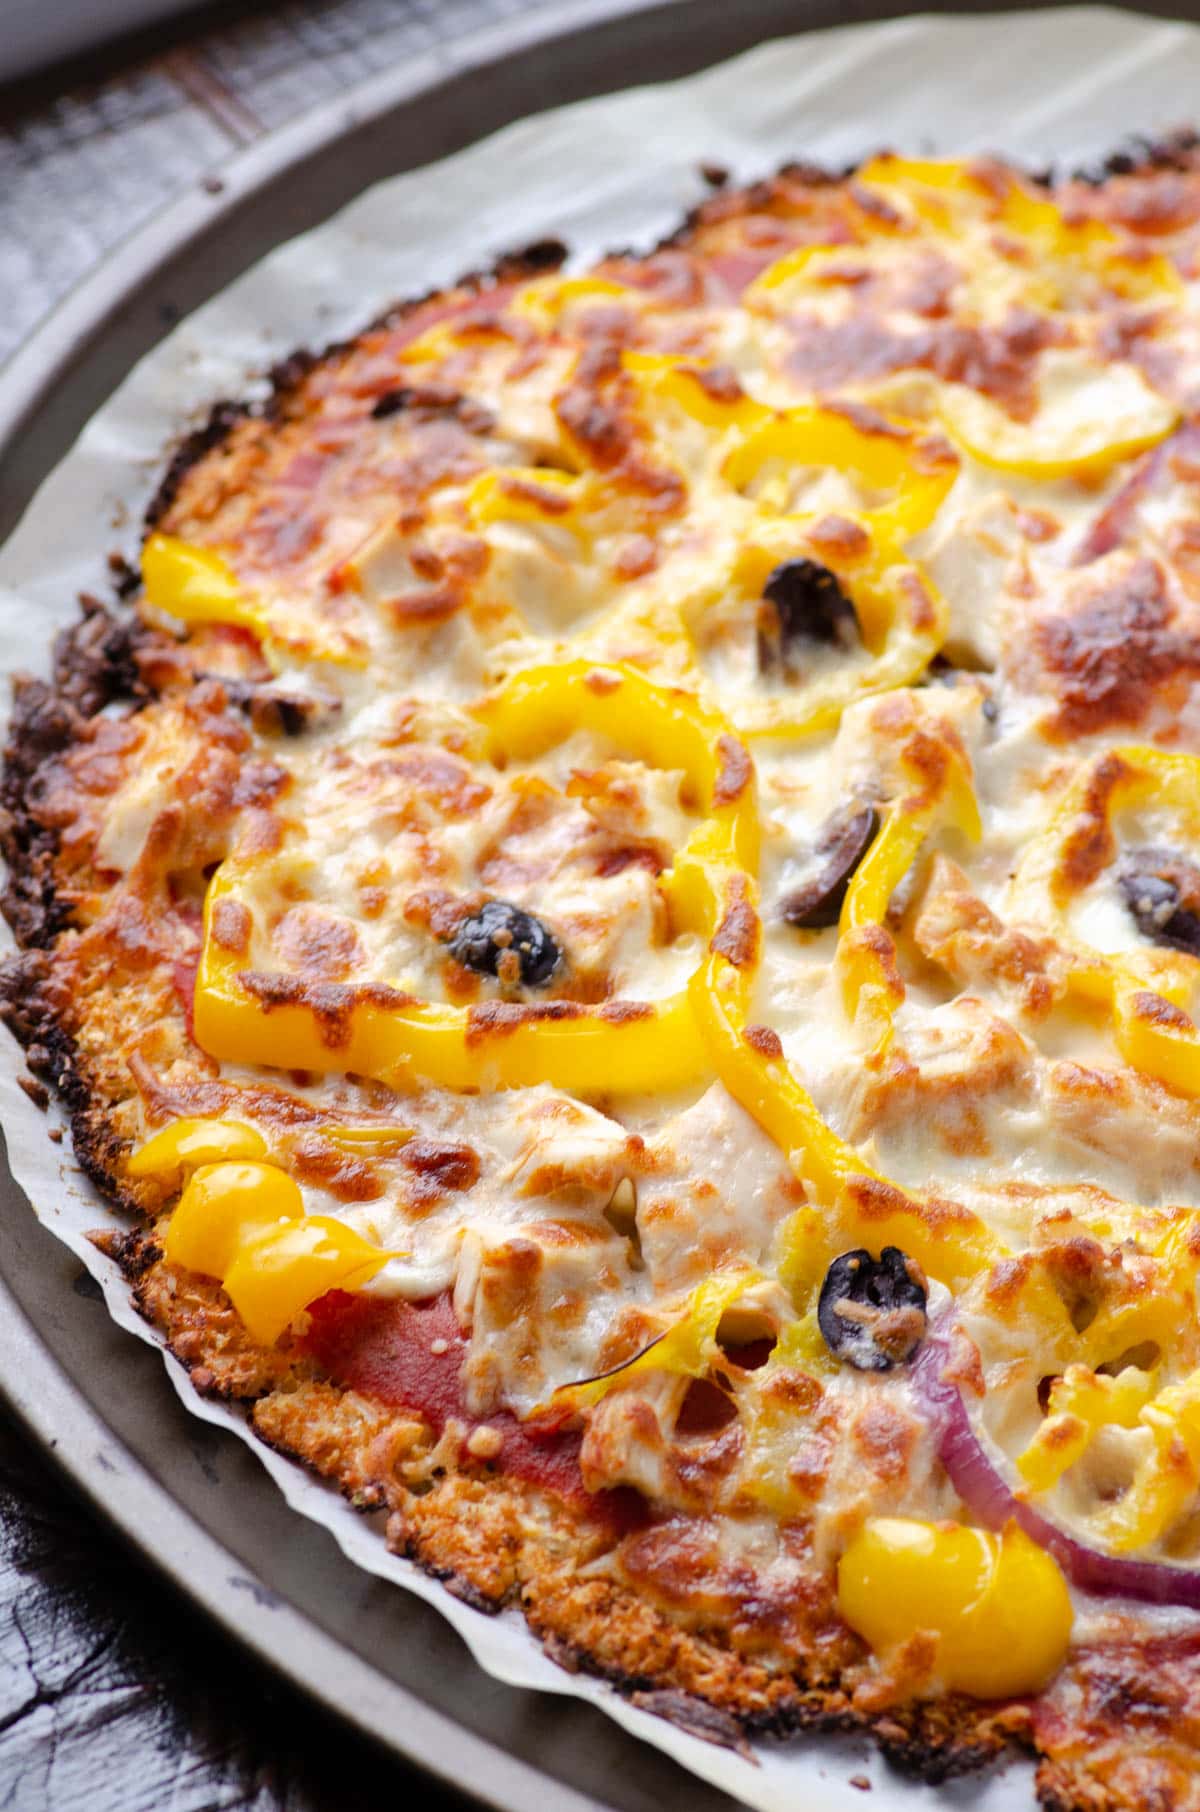
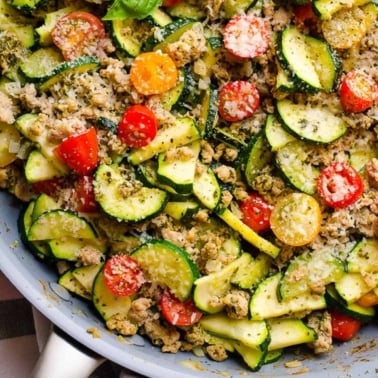
- Add toppings and bake: Add pizza sauce, toppings of choice, cheese and bake again until cheese is melted. Do not overload the baked crust with heavy toppings as you won’t be able to hold the slice then.
Toppings Ideas
- Mediterranean: Marinara sauce, bell pepper, tomato, olives, red onion, feta cheese and fresh parsley or fresh basil.
- Chicken and pepper: Marinara sauce, sliced grilled chicken breast or baked chicken breast or Instant Pot chicken breast, olives, red onion and cheese.
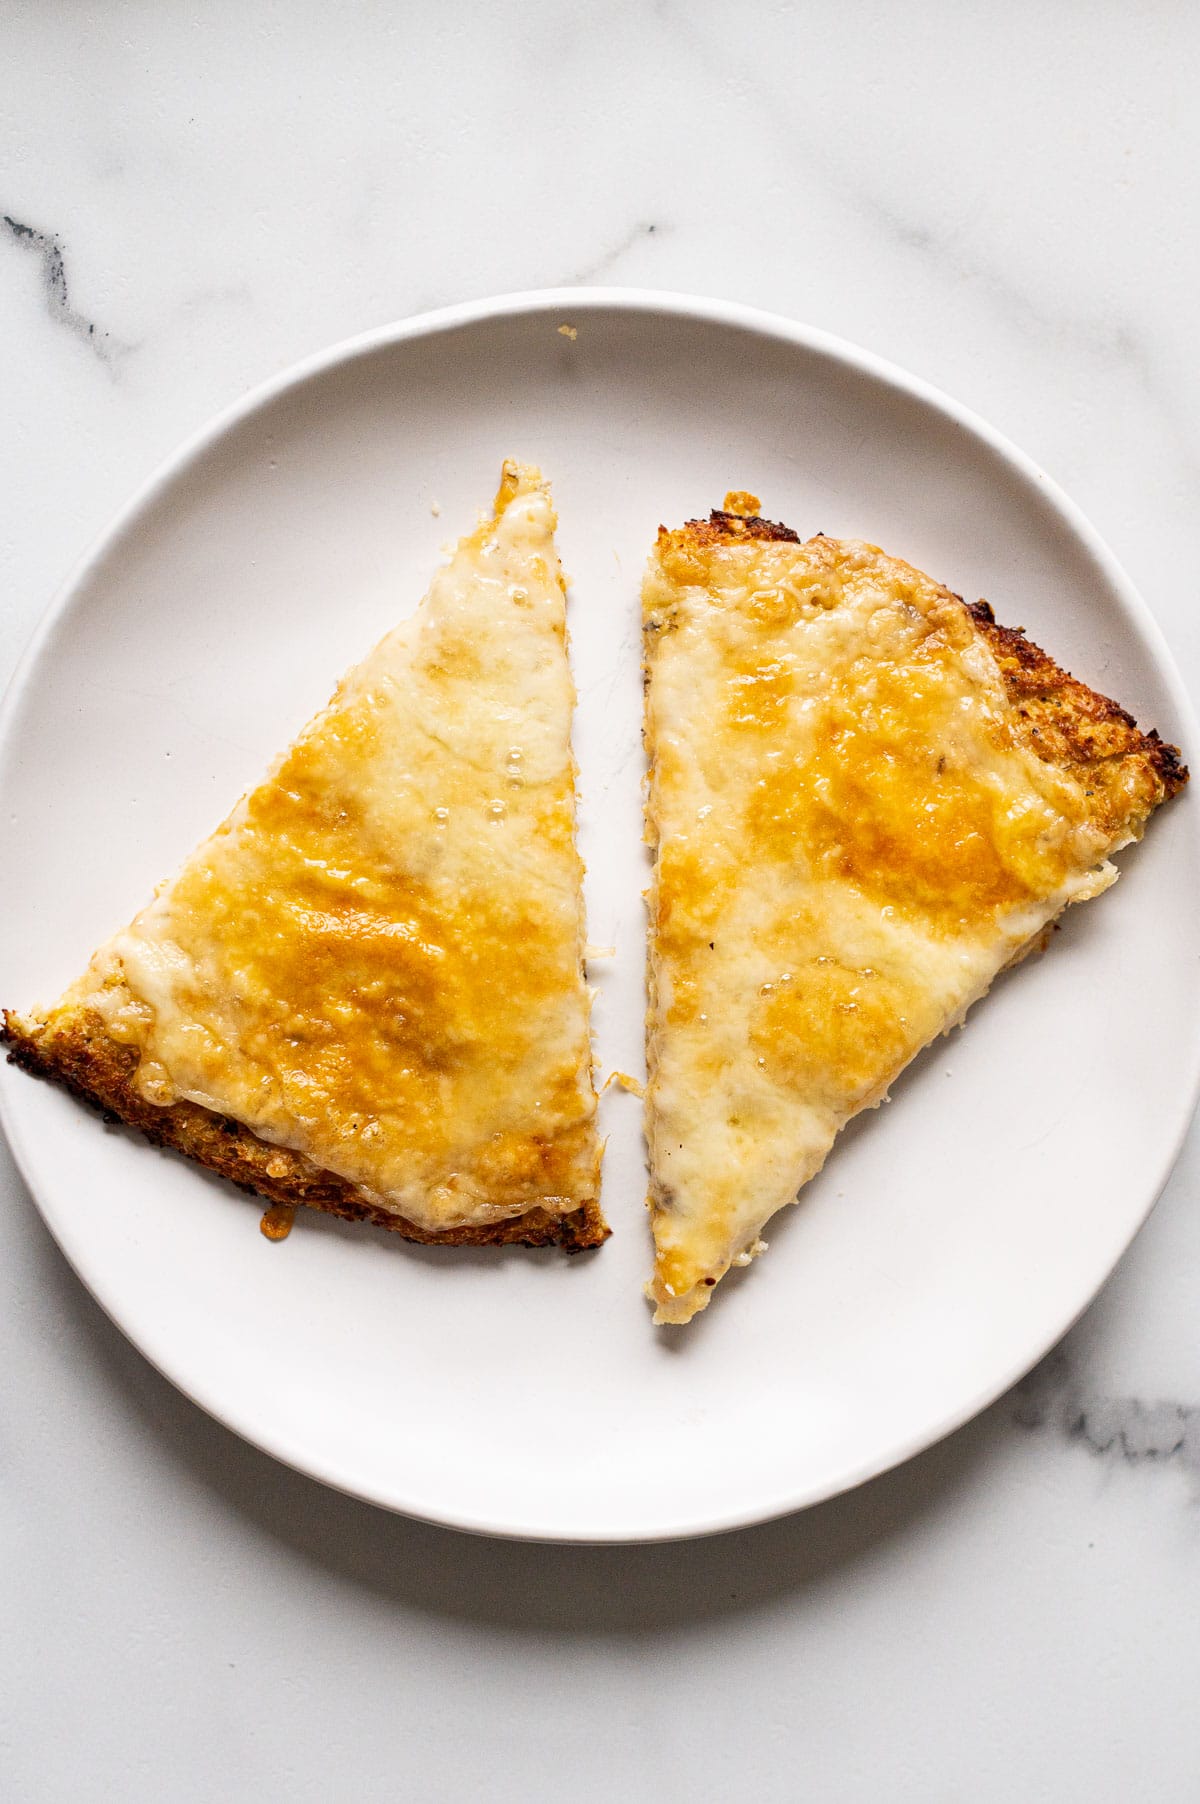
- Cheese: My favorite!
- Asian: Shredded baked honey garlic chicken, finely chopped broccoli, thinly sliced white onions, sriracha and mozzarella cheese.
- Shrimp: Cook shrimp and make sauce as per my shrimp taco recipe, and use fresh mozzarella or provolone cheese. So good!
Question for You
What are your favorite pizza toppings that you tried with this cauliflower crust pizza? I would love to hear your ideas in the comments below!

Tips for Best Results
- Squeeze more than you think: The best advice I can give you for foolproof cauliflower crust is to squeeze cooled cauliflower very well. You really do need to squeeze out more water than you think you’ll ever be able to. Cauliflower should be pretty dry. I squeezed for about 3-4 minutes, until I couldn’t get any more liquid out. If your hands and arms are sore for a bit after, you did it well.
- Size and thickness: You should end up with 10-11 inches wide crust. Make it too thick, and it will be soggy. Make it too thin and it will fall apart.
- Edges: Don’t make edges too thin because they will burn. After you get the crust right size, go around the edges and push them lightly with a palm of your hand.
- Don’t add too many toppings: Do not overload cauliflower crust pizza with too many ingredients because it will become soggy and fall apart.
- Let it cool a bit: If you really want to be able to hold the slice, let cauliflower pizza cool on a baking sheet for 2 minutes, then slice, transfer carefully onto a plate and cool for another minute. Crust will set and solidify on a cool plate!
- Double the recipe: Make 2 cauliflower crust pizzas at a time if you want to feed more than two people. Means two large heads of cauliflower.
- If you don’t have a food processor: Grate cauliflower on a box grater.
How to Freeze It
Because making cauliflower pizza crust is pretty labor intensive, I highly recommend to double or triple the recipe and freeze at least one crust for later! You can freeze 2 larger crusts or 4 smaller individual pizza crusts.
To do so, bake and cool pizza crust and wrap it either in a few layers of plastic wrap or place smaller crusts in a resealable large Ziploc bags.
Freeze for up to 3 months. When you are craving pizza, place frozen crust on a pizza sheet and bake at 400 degrees F for 10 minutes. Then add toppings and bake for another 5-10 minutes.
FAQs
First step is to make sure you squeeze as much water as possible from your cooked cauliflower before shaping the crust. I got about 1 1/2 cups out! However, after you baked the crust for initial 20 minutes and if you would like it to become even more crispy, carefully flip it with spatula and bake for a few more minutes.
Yes, you can taste a little bit of cauliflower in this pizza crust. But because you will add other toppings and cheese, the taste will be minimal. It tastes really good!
In the past decade, cauliflower pizza has gained huge popularity as a low carb gluten free alternative to regular pizza crust. Along the trends like chia pudding and almond flour banana bread.
While cauliflower is a cruciferous vegetable, high in vitamins, fibers and antioxidants, cauliflower crust contains egg and cheese which means saturated fat and cholesterol. But it is lower in calories and carbs. You simply choose whatever works better for your dietary goals!
Unfortunately not. Eggs and cheese act as a “glue” and hold tiny pieces of cauliflower together. Check out this vegan cauliflower pizza crust recipe.
If you have been waiting to jump on the cauliflower pizza crust bandwagon, here is your chance. I think I took all the guessing out for you. Make it and please let me know how your cauliflower pizza recipe turns out!
More Healthier Pizza Crust Recipes to Try
- Chicken pizza crust
- Almond flour pizza crust
- Cottage cheese pizza crust (and cottage cheese flatbread)
- Oatmeal pizza crust
- Sweet potato pizza crust
- Greek yogurt pizza crust
More Low Carb Cauliflower Recipes

Foolproof Cauliflower Pizza Crust
Video
Ingredients
- 2.5 pounds medium-large (6" – 7" wide) head of cauliflower , 2 x 12-16 ounces packages cauliflower rice or frozen cauliflower
- 1 large egg
- 1/2 cup Parmesan cheese or Mozzarella cheese, grated or shredded
- 1 teaspoon Italian seasoning , or mix of dried oregano and basil
- 1/8 teaspoon salt
- 1/4 teaspoon ground black pepper
- Cooking spray, I use Misto
Instructions
- Prep: Preheat oven to 375 degrees F and line baking sheet with unbleached parchment paper.
- Make "rice": Rinse cauliflower, remove the outer leaves, separate into florets and chop into smaller pieces. Process in a food processor in batches, until "rice" texture forms. Do the same with frozen (thawed) cauliflower and skip this step if using store-bought cauliflower rice.
- Cook "rice": Transfer riced cauliflower on a prepared sheet pan or any oven safe baking dish and bake for 15 minutes or microwave in a microwave-safe bowl for 8 minutes. Transfer cooked cauliflower to a large bowl lined with double layered cheesecloth or linen towel, and let cool for 10-15 minutes or until safe to the touch.
- Squeeze: Then hold onto 4 corners, twist cauliflower into a ball and squeeze the liquid out as hard as you can. Be patient and do this quite a few times until barely any liquid comes out. It takes about 3-4 minutes, you should get about 1 1/2 cups water out and your hands will be sore.
- Make dough: Increase oven temperature to 450 degrees F. In a large bowl, add dry cauliflower, egg, cheese, Italian seasoning, salt and pepper. Mix very well with spatula until combined.
- Form crust: Line same baking pan or pizza stone with new parchment paper (just make sure to scrape off any bits of cauliflower) and spray with cooking spray. Transfer cauliflower pizza dough in the middle and flatten with your hands until thin pizza crust of about 11 inches in diameter forms. Be sure to avoid thin edges, so push them in with a palm of your hand.
- Bake it first: Bake crust for 20 minutes. If you would like more crispy crust, carefully flip it with spatula and bake for a few more minutes.
- Bake pizza with toppings: Top cauliflower pizza base with your favorite toppings and bake again until cheese on top turns golden brown. Let cool 1-2 minutes, cut into 8 slices with a pizza cutter and enjoy!
Notes
- Store: Refrigerate leftovers in an airtight container for up to 2 days.
- Freeze: You can freeze 2 larger crusts or 4 smaller individual pizza crusts. Bake, cool and wrap crust in plastic wrap. Or place in a resealable extra large Ziploc bag. Freeze for up to 3 months. When you are craving pizza, place frozen crust on a pizza sheet and bake at 400 degrees F for 10 minutes. Then add toppings and bake for another 5-10 minutes.
- Frozen cauliflower rice: No need to thaw, just cook from frozen.
- Squeeze more than you think: The best advice I can give you for foolproof cauliflower crust is to squeeze cooled cauliflower very well. You really do need to squeeze out more water than you think you’ll ever be able to. Cauliflower should be pretty dry. I squeezed for about 3-4 minutes, until I couldn’t get any more liquid out. If your hands and arms are sore for a bit after, you did it well.
- Double the recipe: Make 2 pizza crusts at a time if you want to feed more than two. Means two large heads of cauliflower.
- Where can I find cheesecloth? You can find cheesecloth in most well-stocked supermarkets, dollar store or on Amazon for a very reasonable price. Linen towel works great too. You can throw both in the washer after.
- What baking sheet can I use? Any sheet pan that can fit 11 inch wide crust or pizza stone works.
- If you don’t have a food processor: Grate cauliflower on a box grater or buy cauliflower rice.
Nutrition
Nutrition information is automatically calculated, so should only be used as an approximation.


Turned out perfect! Looks great and tasted delish! I think taking the time to get the water out of the cauliflower is key to a perfect Crust that does not fall apart!
You got it right. I’m so happy to read this! Thanks for your positive feedback!
Sadly mine was a disaster. I spent over 20 min squeezing and squeezing the liquid out but after the pizza had been in the oven for 20min it all fell apart like biscuits when I went to turn it over. Super disappointed as wasting time and ingredients as had to give it to the chickens
I will be placing my crust on a preheated pizza stone instead of doing any flipping. hope that will work.
Can this recipe be frozen?
Yes
Olena, another winner. This crust was fabulous…not limp at all. I even put a lot of toppings since I made a Mediterranean-style pizza. Delicious! Yes, it was a workout, but one I am willing to do.
So happy to hear, my friend!
Followed the directions and it turned out perfect! I grow cauliflower in my garden so loved using it for this delicious pizza crust!
I’m so glad you enjoyed it! Thank you for the wonderful review!
Is this gluten free?
Yes.
It can in fact be made vegan 🙂 I swapped the egg for a flax egg, and used vegan cheese. I always add a few minutes of baking time for flax eggs. Great recipe, thank you!
My pleasure! Yes, I agree, I have tested it to be vegan last month and will post that recipe soon as well.
I followed your detailed instructions ‘exactly’ and this came out perfectly and it was super delicious! I used rice cauliflower and the package I used only yielded 3/4 cup (after all the liquid squeezed out) which didn’t seem like enough so I used 2 pkgs and doubled the recipe ingredients. It was perfect for the pizza pan. Also flipped it onto another parchment lined & sprayed pan as another reviewed mentioned. Awesome! Thank you for a great recipe!
I’m so glad you enjoyed it! Thank you for the wonderful review!
Hi! Have you ever made these into mini personal pizza crusts? If so what are the baking times? Thank you for this great recipe!
I haven’t made them but I would bake half the time. Just keep an eye on them until they are crispy on edges and not burning.
I have really wanted to try making a cauliflower crust but loathe the idea of multiple sessions of wringing out extra moisture from the riced cauliflower. For what it’s worth, I am sharing my experience of making this recipe minus the cauliflower wringing process. Instead, I followed all recipe instructions, but added a few tablespoons of coconut and soy flour (both of which I had on hand). When the resulting dough seemed a bit too dry, I added a scant tablespoon of mayonnaise as opposed to another whole egg. This worked out beautifully. I suspect this could work even better with a few tablespoons of some starchy powder, like arrowroot or tapioca, if personal diet allowed.
Thanks so much for posting the recipe 🙂
I’m so glad you enjoy this recipe so much!