These Healthy Key Lime Pie Bars are sweet, tangy, and impressive healthy snacks or no bake dessert. They’re a handheld and healthy version of a classic dessert made easy with coconut milk, maple syrup and gluten free crust.
Why not also bring along some healthy lemon bars or healthy strawberry cheesecake bars!
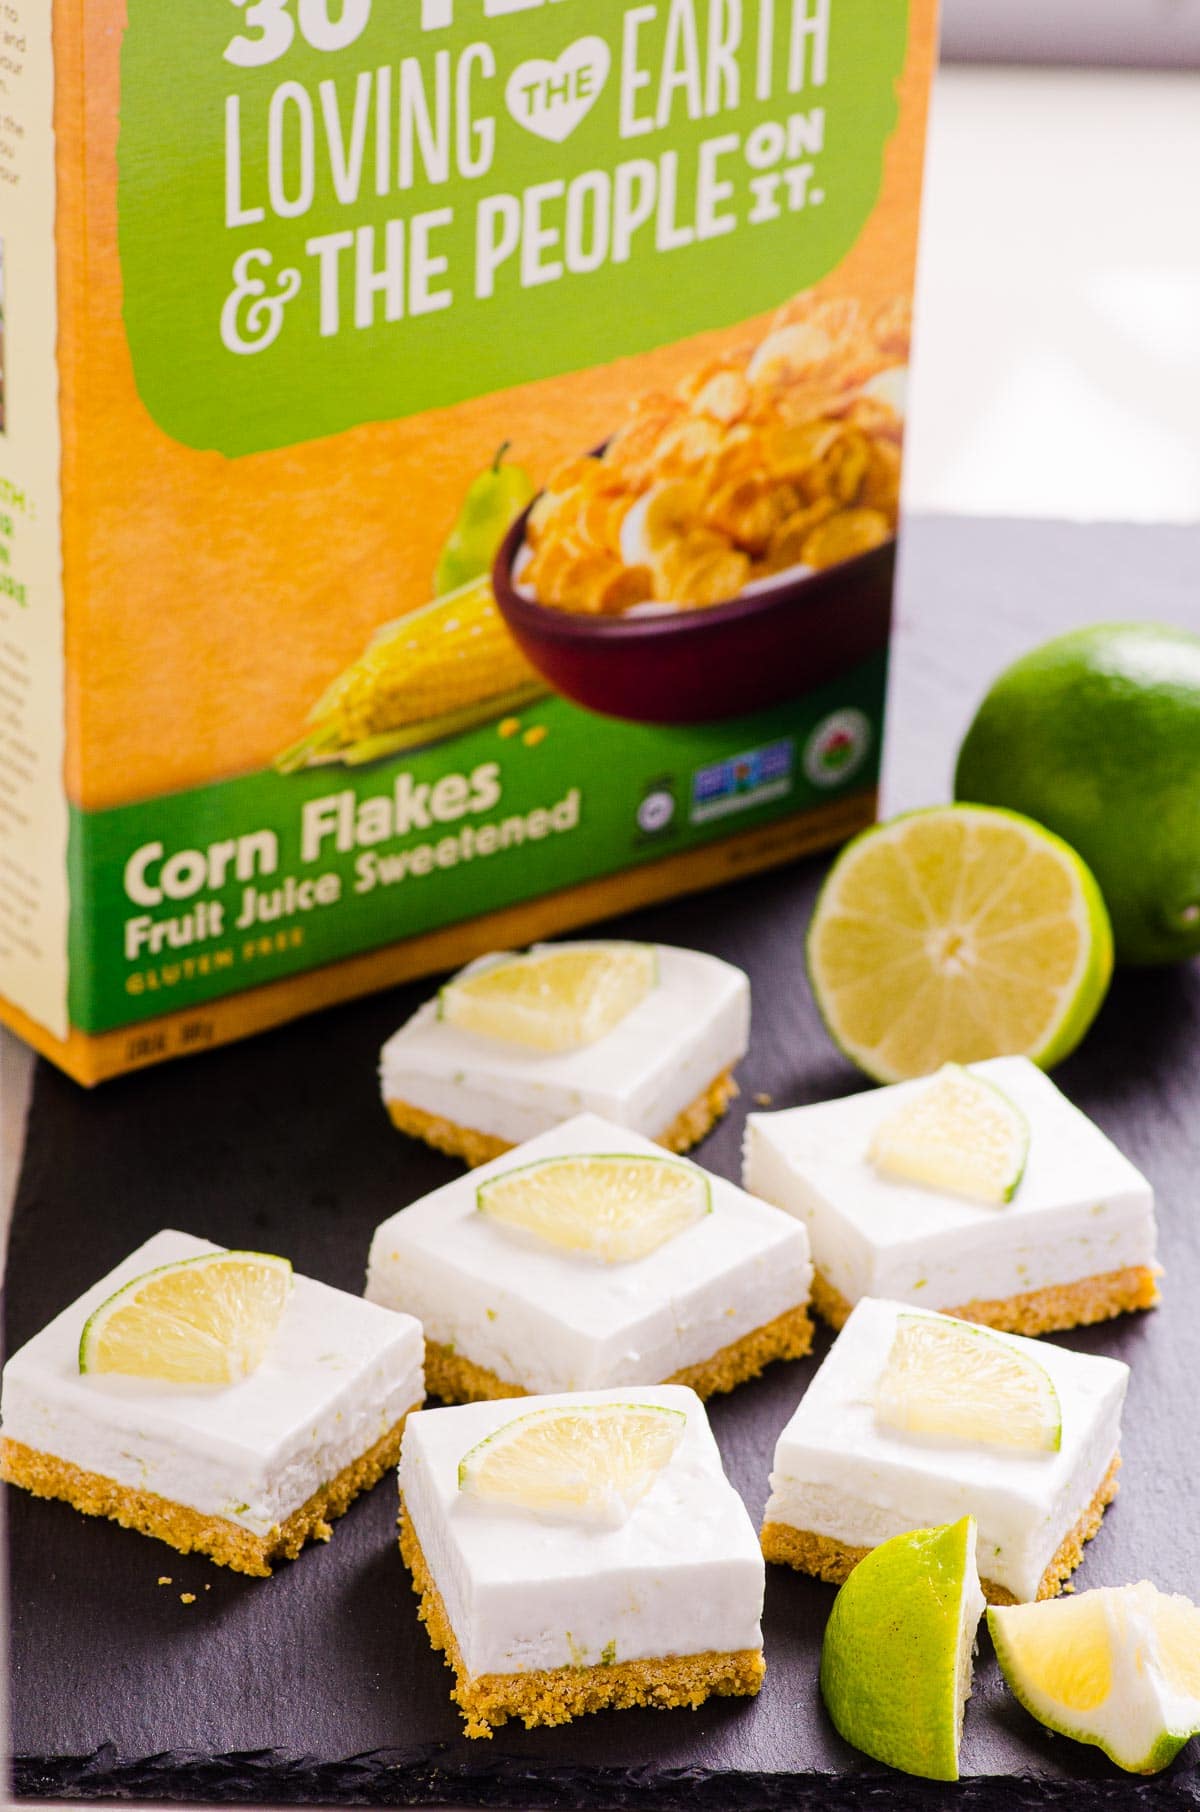
Table of contents
Key lime pie is a classic summertime dessert. It’s got a crust for a base, and the pie filling is tart, refreshing, creamy, and bursting with sweetness and citrus.
These tasty and healthy key lime pie bars don’t skimp on any of the flavors and textures of the traditional key lime. Plus they are refined sugar-free, dairy-free, and gluten-free!
Plus, slicing them into bars just makes it so much easier to serve and carry.
Is There a Difference Between A Regular Lime and a Key Lime?
There is a difference! Key limes, as you’ve probably seen, are small, round, and produce more seeds. They have a distinct flavor which, if you’ve ever had one, you’ll know there is a difference.
It takes more key limes to produce the same amount of juice as regular limes, and they’re actually more yellow than they are green.
The good news is, in most cases, they can be used interchangeably. In all honesty, I have never had key lime anything, and I wasn’t going to go out of my way to search for them.
So, I am using regular limes in this recipe and they are still sensational!
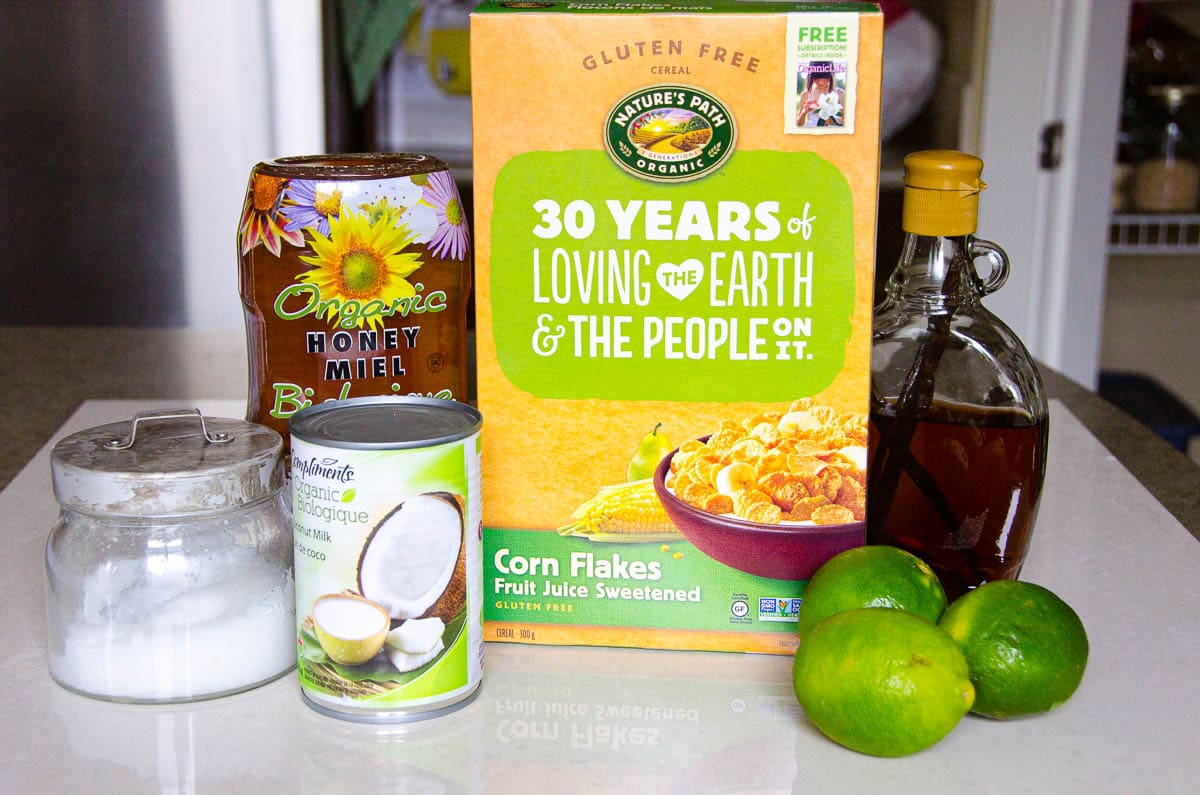
Crust Ingredients
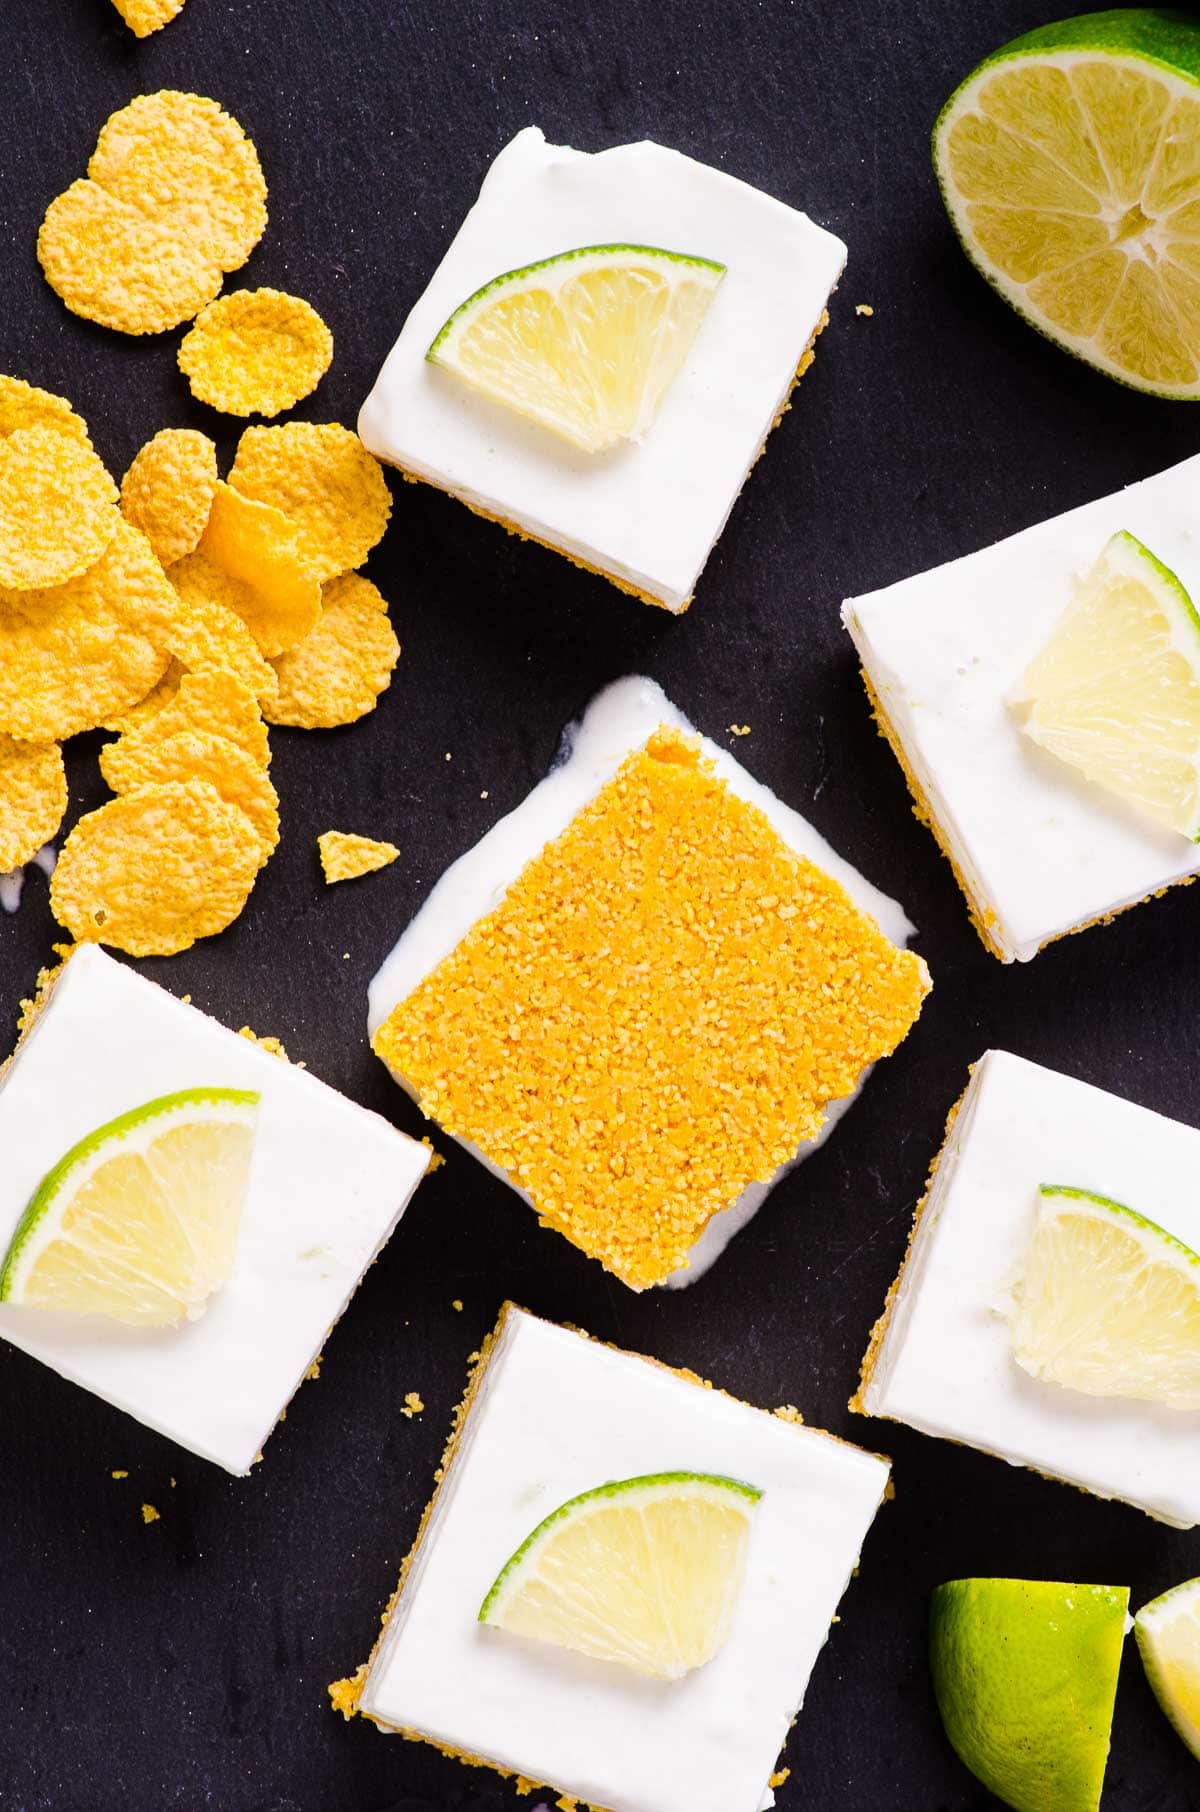
- Cornflakes: Many no-bake desserts call for graham crackers crust. However, If I can find a gluten-free, vegan, and cheaper way to go, I’m gonna! I use cornflakes for healthy banana cream pie, too!
- Honey: Naturally sweetened with honey or maple syrup. Both pair well with the tartness of the lime.
- Coconut oil: It starts in the melted form to combine with the crust, but solidifies when chilled which helps bind the crust into a strong base.
- Pure vanilla extract: A bit of warm flavoring to balance out the sour citrus!
Filling Ingredients
- Coconut milk: Full fat from a can. You want to make sure you have both the cream on top and the liquid at the bottom, which you don’t get from milk in a carton.
Chill! Place the entire can of coconut milk in the fridge the night before you make this dessert!
- Key lime juice and zest: If you can get your hands on key limes, by all means, use them! If not, regular limes, also known as Persian limes, are great.
- Honey: Just like in the crust, you have the option of using either honey or maple syrup. Provides sweetness and a ton of extra flavor.
How to Make Healthy Key Lime Pie Bars
Before you begin, don’t forget to place a can of coconut milk in the fridge to chill the night before.
Then before making the bars next day, place a large glass bowl and mixers in the freezer to chill. You’ll see why in a few minutes.
The Crust

Ground the corn flakes into a coarse texture using a blender or food processor. Corn flakes contain sea salt already, so all you need to add is melted coconut oil, honey, and pure vanilla extract.
Mix until well-combined. The crust should be wet and sandy and come together in big clumps.
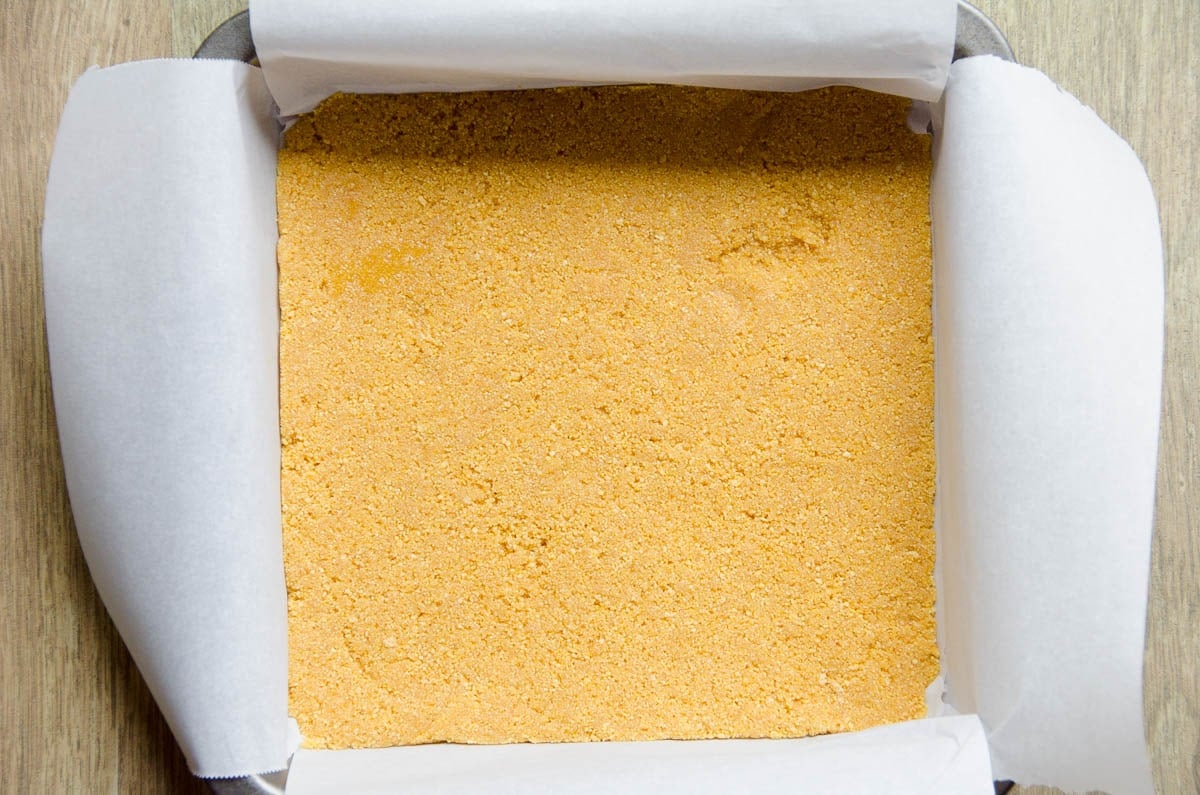
Transfer the crust mixture to a parchment paper-lined 8 x 8 baking dish. I like to leave a bit of the parchment paper over the edges so I can easily remove it from the pan later on. Level the crust with a spatula to make sure the edges are nice and straight.
Firmly pack it down with the back of my stainless steel measuring cup. This is the way to get clean lines for the presentation! When sliced you’ll see exactly where the crust ends and the filling begins.
Off to the freezer for coconut oil to solidify and honey to act as glue. Takes about 15-20 minutes, so in the meantime, we can prepare the filling!
The Filling
Grab the coconut milk from the fridge, do not shake it! You want the cream and liquid to remain separated.
Take out the bowl and beaters from the freezer, scoop out the cream from the top of the can and place it into the chilled bowl. Refrigerate the remaining liquid.
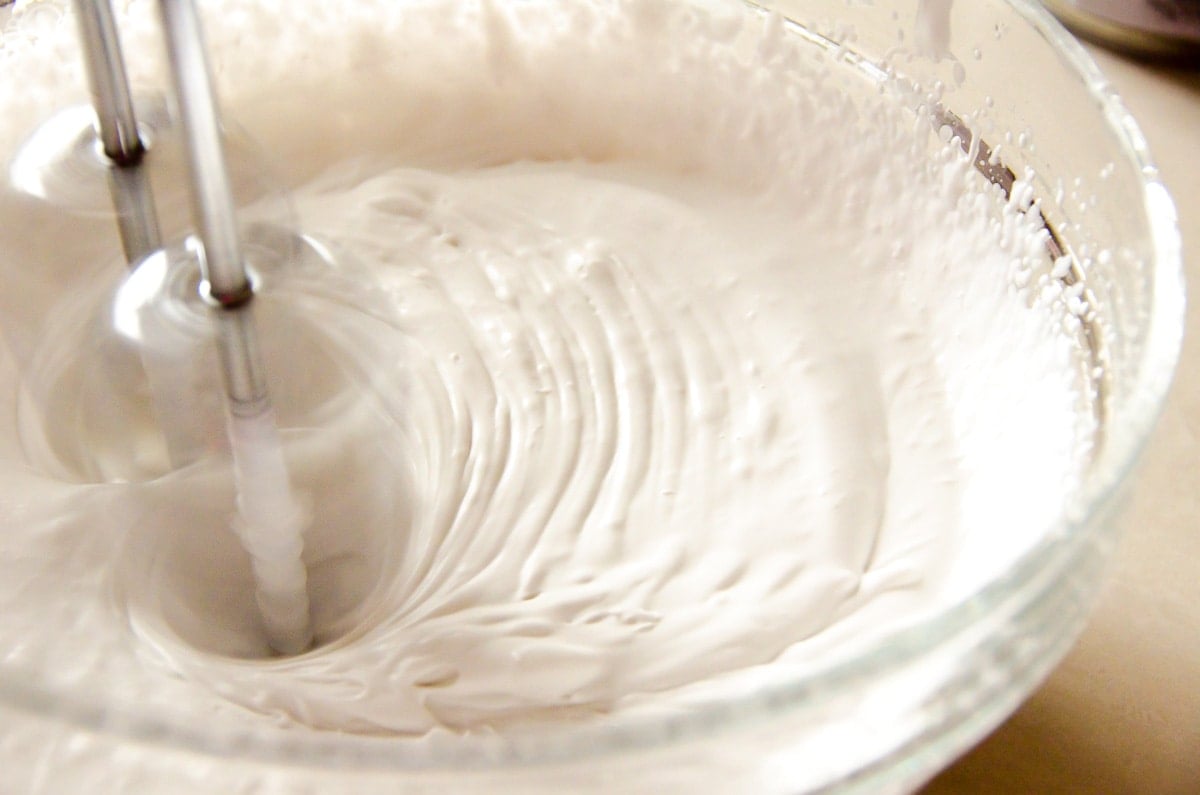
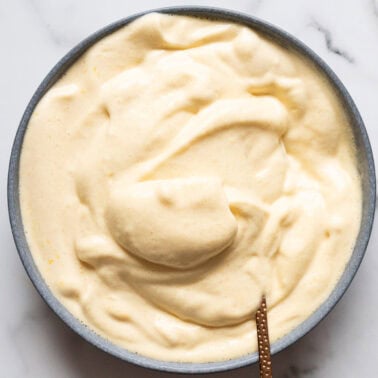
Beat the cream with a mixer for a few minutes until blended and creamy. It’s ok if there’s a bit of liquid from the coconut milk in there with it.
It won’t be fluffy like whipped cream, and the resulting texture will be determined by how well the cream and liquid are separated.
Add the remaining ingredients and mix well.
Limes are not easily squeezable like lemons. I learned that hard way! Roll them to squish on a cutting board to get juices flowing inside. Owning a sharp zester, like this Microplane, is very helpful.
Assembly
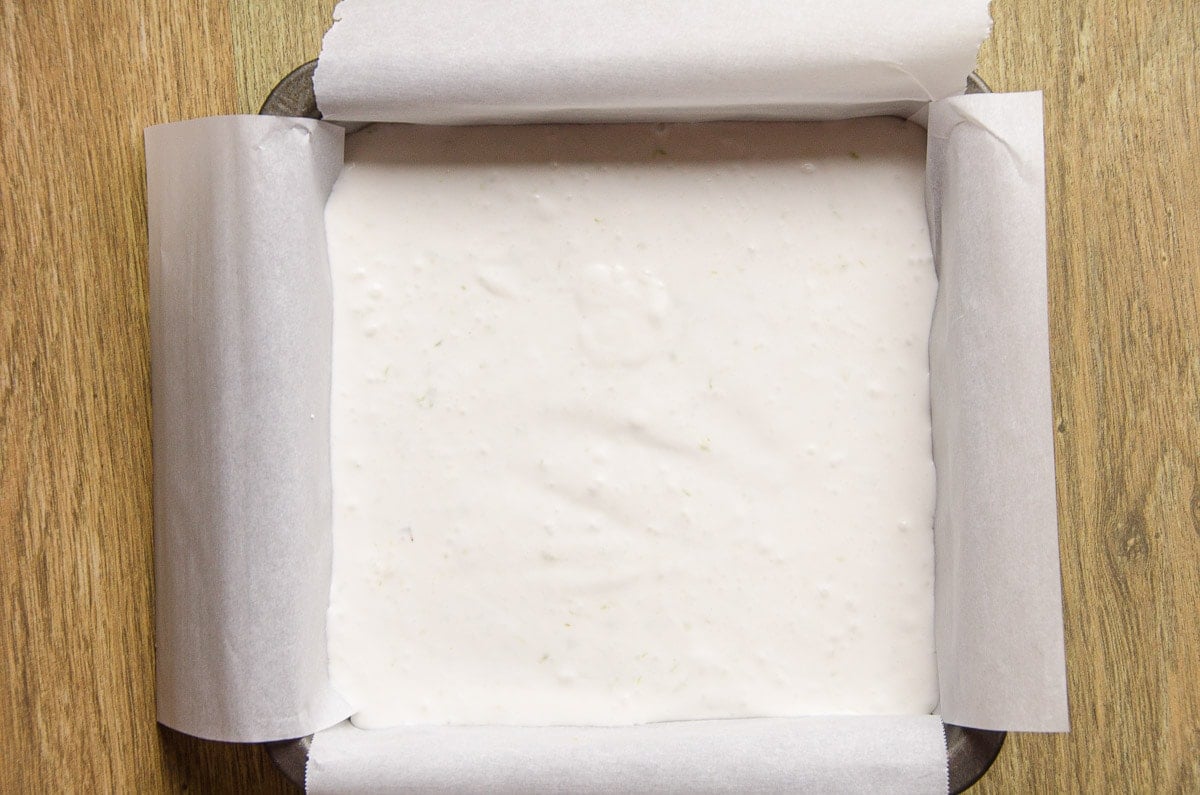
Pour filling into the previously prepared crust and level it out with a spatula. Transfer the pan to the freezer and let it sit for at least 2 hours.
Once it has set, place it on the counter and use the flaps of the parchment paper to lift it out of the pan.
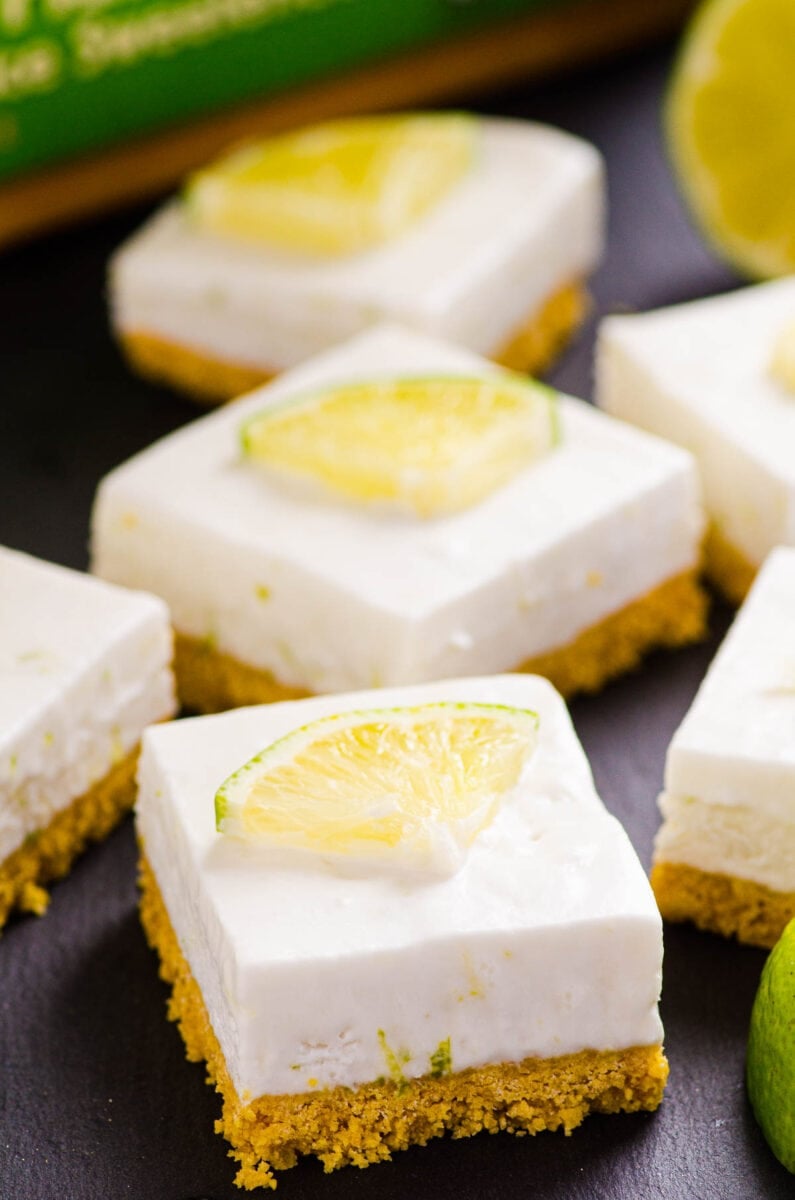
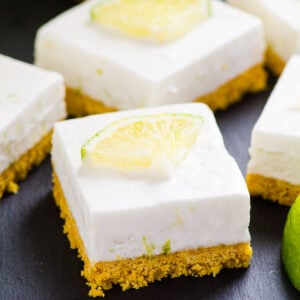
Slice into 16 healthy key lime pie bars using a sharp knife. For a clean look, be sure to wipe the knife blade clean in between slices. Enjoy!
If you’re feeling fancy, top each slice with a piece of lime! If you’re feeling naughty, top it with a slice of candied lime!
The texture is a cross between ice cream and New York-style cheesecake. I’m so honestly proud of this dessert. I, a Ukrainian, making delicious Key Lime Squares. I’m not only a garlic and dill girl after all!
Tips, Tricks and Storage Details
These healthy key lime pie bars couldn’t be easier, but it never hurts to share a few extra tips!
- Frozen bars are easier to slice. Don’t skip the chill time! You want them solid. Unlike a traditional baked key lime pie, there are no egg yolks to help maintain its structure.
- No bottled lime juice, please! Since there are so few ingredients, I encourage you to find the highest quality. Freshly squeezed tastes freshly squeezed!
- The brand of coconut milk will make a difference to the outcome of your dessert. Some are grainy and do not mix well. I always like to recommend Thai Kitchen, Trader Joe’s coconut cream, or compliments canned coconut milk. They contain guar gum which helps with the consistency.
- If your bars are soft straight from the freezer it typically means the coconut milk didn’t separate well enough. Sometimes you have the opposite problem and they’re frozen solid. In this case, thaw them for 10-15 minutes before taking a bite!
- Best kept in the freezer. Since they’re already frozen, they won’t clump together. Transfer them to an airtight container or freezer-friendly Ziploc bag and take one out when the cravings hit!
FAQs
I aim to always find a way to use anything with as little processing as possible. Therefore unrefined is the way to go. It also solidifies better which is a major bonus in the case of making a crust!
This chocolate Nutella like crust from my healthy no bake cheesecake will be great! You may also love this nut crust from healthy no bake nutella pie!
I don’t recommend it because it might not set as well and bars might not taste as rich. Healthy snacks can still be decadent!
Yes. It’s the cream that makes it creamy and luscious.
More Delicious Healthy Dessert Recipes
- Healthy homemade popsicles
- Coconut oil fudge
- Strawberry yogurt
- Banana snickers
- Frozen cottage cheese bark
You may also like this fruity healthy strawberry smoothie or healthy iced tea with lemon and lime!
6-Ingredient Healthy Key Lime Pie Bars
Ingredients
Crust:
- 3 cups Nature's Path Corn Flakes, fruit juice sweetened
- 4 tbsp coconut oil, melted
- 3 tbsp honey or maple syrup
- 1/2 tsp pure vanilla extract
Filling:
- 14 oz can coconut milk, full fat
- 1 lime, zest of
- 4 tbsp lime juice, 1-2 limes
- 3 tbsp honey or maple syrup
Instructions
- Place can of coconut milk in the fridge overnight.
- Line 8" x 8" baking dish with parchment paper leaving overhang. Place glass bowl and mixer beaters in the freezer.
- In a small food processor or powerful blender, process corn flakes until finely ground. Add to a medium bowl along with coconut oil, 3 tbsp honey and vanilla extract, and mix well with spatula until combined. Mixture should be crumbly sticking together into big lumps.
- Transfer to previously prepared baking dish and level evenly with spatula not missing the edges. With a bottom of a glass or large measuring cup, press crust down to pack tightly. Place in the freezer while you are making the filling.
- Open can of refrigerated coconut milk and scoop out white cream into chilled bowl. Refrigerate clear liquid separately and use in smoothies etc. It doesn't matter if some clear liquid got mixed a bit with cream.
- Beat coconut cream with a hand mixer for a few minutes. It doesn't have to get thick and fluffy as a whipped cream, and thickness will depend on how well coconut cream separated from clear liquid. Add lime zest, lime juice and 3 tbsp honey, and beat until well mixed. Pour on top of previously prepared crust and level with spatula. Freeze for at least 2 hours.
- Holding onto flaps remove bars from the baking dish, place on a cutting board and cut into 16 squares using sharp long knife (wipe with towel in between cuts for clean look). Serve frozen or a bit thawed.
Notes
- Store: In a freezer in an airtight container for up to 3 months.
- I recommend using Thai Kitchen, Trader Joe’s Coconut Cream or Compliments canned coconut milk with creamy consistency. I wouldn’t use international brands because it is grainy and does not mix well.
- Thawing time depends on how much clear liquid got into the filling. This time for some reason coconut milk didn’t separate well so squares were soft straight from the freezer. The other time, same brand of coconut milk separated well and I had to thaw bars for around 10 – 15 minutes.
Nutrition
Nutrition information is automatically calculated, so should only be used as an approximation.
Hi, just wondering how long to allow partial defrost without losing the texture of the topping. Going to serve as a dessert and want a spoon or fork to be able to break into the base.
It depends a lot on the temperature outside. If it is hot, I would give it 10-15 minutes and less time, if it’s cool. You can always test with one bar before guests arrive.
Hi, I don’t often find limes here in Belgrade, Serbia. Would using lemons yield same results texture wise but just lemon flavour? Lemon bar basically.
Yes, I am pretty sure it would work. You can also check out my healthy lemon bars – they require baking though.
So tasty! We just tried this recipe tonight! The coconut milk didnt whip up very well so I added a package of light jello to thicken it up 🙂 but the taste was perfect!!!
I am glad you enjoyed it Ayse!
Why does the coconut milk need to be refrigerated first? Is that necessary?
Yes. Cream has to be separated from a liquid in order to solidify in bars into creamy texture. I explain it in a post I think. Think of whipping cream vs milk.
Oh, wow, these look absolutely stunning!! Lime and coconut are so delicious together, this no bake recipe sounds just perfect for me 😉
I’ve had Key Lime desserts on the brain for a while now and cannot wait to give these a whirl! Never thought to use organic corn flakes in place of a graham cracker crust, which I’ve used in the past. It’s summer and I’m always bringing desserts to parties (and I don’t even eat my own desserts because they are not good for you) Isn’t that terrible? I feel like I could bring this and eat it too. Yippee skippeee.
Olena, these look amazing! I love easy no bake desserts for summer and I love that these are so healthy! I will need to look into buying those cornflakes somewhere.
I LOVE that you used corn flakes for a graham cracker crust. Looks super easy, and a much better alternative than graham crackers.
Frozen sounds delicious 🙂 I am pinning- and trying these soon!